 Save
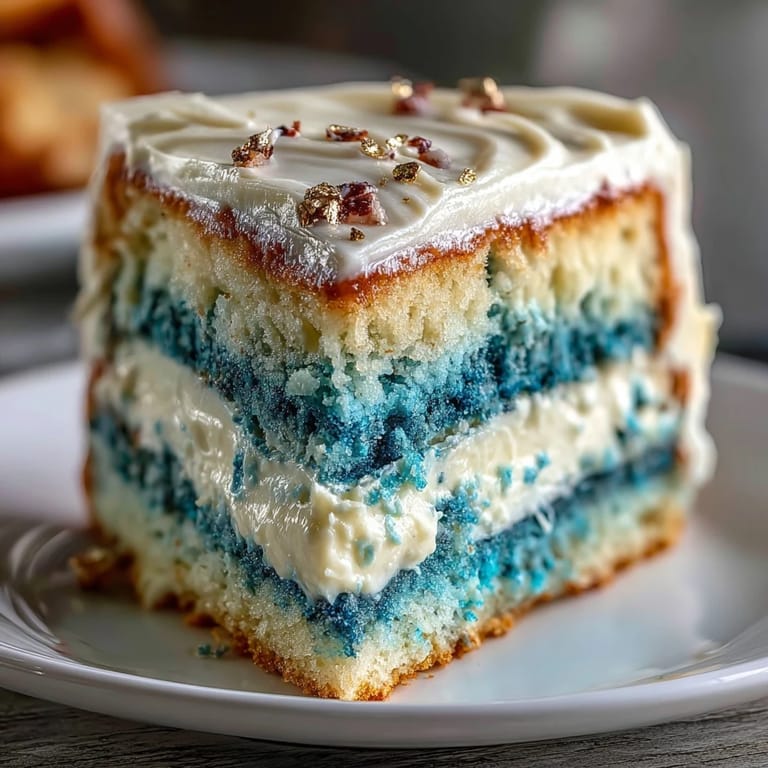
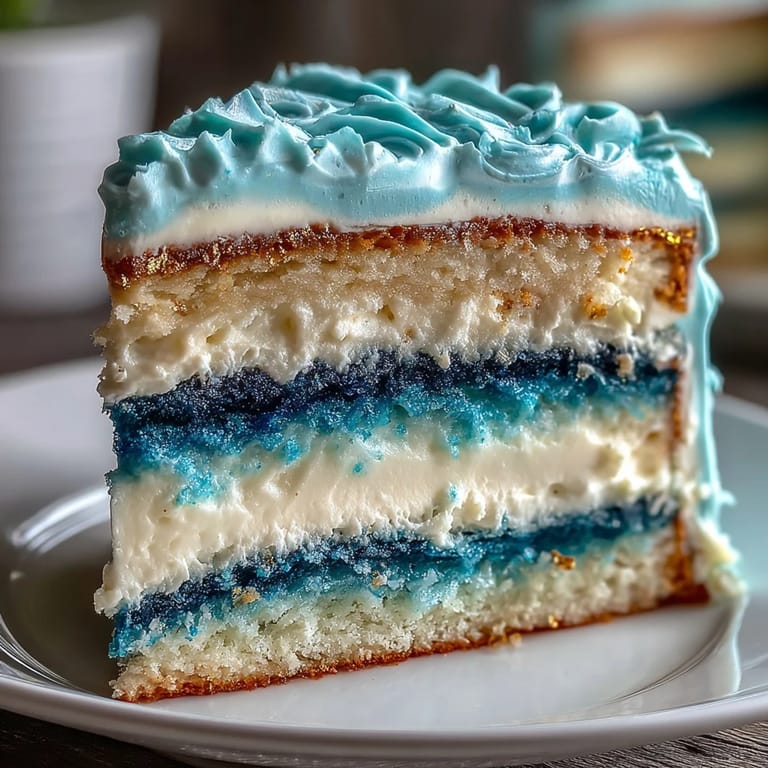
Save When I first saw a cake gleaming in shaded blues and gold at a friend's graduation party, it felt almost too regal to slice. The shimmer of edible gold caught the sunlight, making us all pause and stare before someone (bravest in the group) finally reached for the knife. I’d always admired those ombre cakes but never imagined trying to make one until that day. Baking this celebration cake at home, I discovered just how much fun it is to mix food color, layer textures, and decorate with edible bling. There’s something deeply satisfying about watching the gradients emerge as you build the tall layers one by one.
The afternoon I made this for my little brother’s graduation, the kitchen filled with laughter and a soundtrack of half-finished speeches and bustling friends. As we waited for cake layers to cool, someone spilled blue coloring and another tried (unsuccessfully) to set a graduation cap on the dog. By the time I swirled the final gold streaks across the blue, the whole kitchen was quiet, holding their breath before that first slice. I found the layering process surprisingly meditative, despite the chaos around me. Inevitably, a few crumbs ended up decorating the buttercream, but the sparkle more than made up for it.
Ingredients
- All-purpose flour: Choose a fresh, sifted flour to ensure light, tender layers—never skip this step, or your cake can turn dense.
- Baking powder and baking soda: These give the cake its rise and keep the layers soft; measure carefully for even results.
- Salt: Just a pinch sharpens the sweetness and makes the flavors sing.
- Unsalted butter, at room temperature: For both cake and buttercream, soft but not melted butter is key to achieving that creamy, fluffy crumb.
- Granulated sugar: This brings sweetness and structure, but beating it until airy is what really matters for lightness.
- Eggs, at room temperature: Room temperature eggs blend more smoothly and keep the batter from curdling.
- Pure vanilla extract: Real vanilla, not imitation, deepens the flavor and pairs beautifully with the blue colors.
- Whole milk, at room temperature: Cold milk can shock the batter; room temperature helps everything bind together gently.
- Blue gel food coloring (navy, royal, and light blue shades): Gel colors produce vivid blues without thinning out the batter—small drops make a big impact.
- Powdered sugar, sifted: Clumps in powdered sugar can ruin the buttercream texture, so sifting is vital.
- Milk or cream: Add in just enough to make the buttercream luscious and spreadable, not runny.
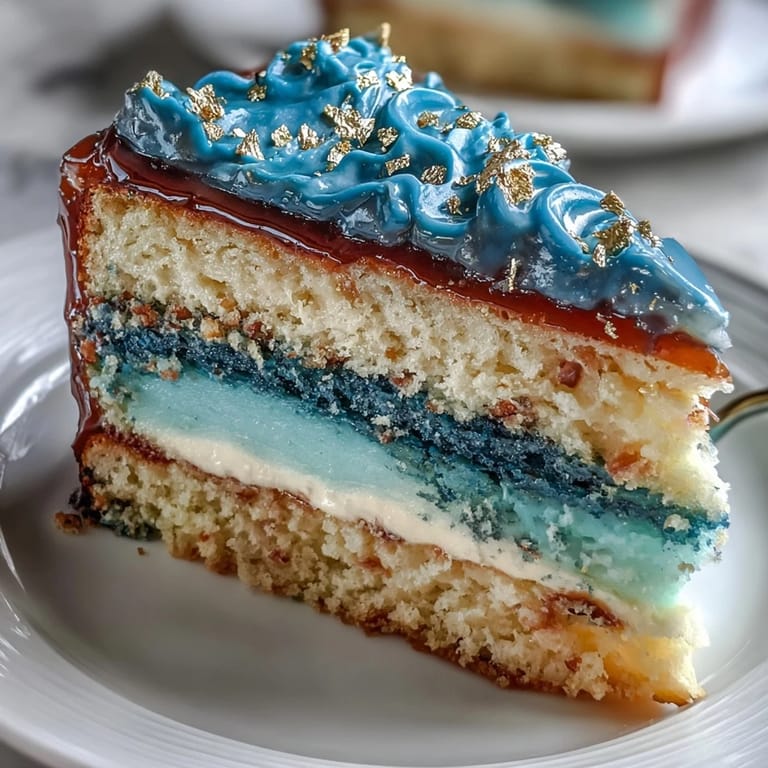
- Edible gold leaf or gold dust: Not only stunning to look at, but these create that luxury finish—don’t rush applying them.
- Clear alcohol (vodka or lemon extract): Needed for gold dust application, it evaporates quickly and helps the gold stick without flavor.
Tired of Takeout? 🥡
Get 10 meals you can make faster than delivery arrives. Seriously.
One email. No spam. Unsubscribe anytime.
Instructions
- Prep Your Pans:
- Grease and line three 8-inch cake pans with parchment, making sure every corner is covered so your cakes pop out easily. The rustle of parchment always makes me feel like something special is about to happen.
- Mix the Dry Ingredients:
- Whisk flour, baking powder, baking soda, and salt together until everything’s airy and well combined – you don’t want any clumps hiding at the bottom.
- Cream Butter and Sugar:
- Beat butter and sugar until pale and fluffy; you should see swirls and hear the mixer's steady hum, a sign you’re on the right track.
- Add Eggs and Vanilla:
- Drop in the eggs one at a time and mix gently, then add vanilla – the batter starts smelling sweet and thick, almost like a cloud.
- Combine with Milk:
- Alternate flour mixture and milk in three rounds, beginning and ending with flour, just mixing until the batter is smooth and no dry spots remain.
- Color the Batter:
- Divide the batter evenly into three bowls and tint each with enough blue gel coloring to create a gradient from light to dark blue – use a toothpick for precision.
- Bake the Layers:
- Pour the colored batter into the pans and smooth the tops; bake until a toothpick comes out clean, about 25–30 minutes, and cool on racks.
- Buttercream Magic:
- Beat butter until creamy, gradually add powdered sugar, then vanilla and salt; add milk or cream slowly until the buttercream is luxuriously spreadable.
- Tint and Reserve:
- Set aside 1 cup of buttercream for the crumb coat, then tint the rest a deep blue for the final, dramatic color.
- Layer and Stack:
- Level the cakes if needed, stacking darkest blue at the bottom, spreading buttercream between layers, then the lighter blues on top.
- Crumb Coat and Chill:
- Apply a thin crumb coat with reserved buttercream and chill for 20 minutes – crumbs sticking to the spatula are totally normal.
- Final Frosting:
- Frost smoothly with the deep blue buttercream; use lighter blue if you want a softer ombre effect near the top.
- Gold Accents:
- Apply gold leaf or brush gold dust mixed with alcohol across the cake’s surface, focusing on streaks or edges for impact.
- Chill and Serve:
- Chill the finished cake until you’re ready to slice and celebrate.
 Save
Save The toast right before serving this cake was unforgettable: everyone gathered, faces shining, someone shouted congratulations, and the golden shimmer seemed to celebrate along with us. It ended up in dozens of photos, but the real magic was in the taste—sweet, fluffy, and perfectly festive.
How to Get an Ombre Gradient Just Right
Adjusting the color takes patience—add gel coloring drop by drop and stir thoroughly. Sometimes I swirl two shades together at the border for a natural blend, and if you overdo it, no worries, just layer more buttercream over the edge. The gradient effect looks best when you step back and let it happen rather than fuss with it up close.
Buttercream Troubleshooting for Smooth Results
Butter temperature changes everything—too cold and you’ll be wrestling stiff frosting, too warm and it’ll slide right down the cake. If the buttercream splits, keep beating and gradually add a spoonful more cream until it comes together. The offset spatula makes smoothing easier, especially on a turntable.
Decorating Tips That Make the Gold Stand Out
Gold leaf tears easily but will stick if you gently press it with dry hands or tweezers. If brushing on gold dust, mix lightly and use short strokes rather than dragging so the gold sparkles without streaking. Graduation-themed toppers are fun but don’t let kids eat them unless they're labeled edible.
- Decorate with gold just before serving for peak shine.
- Layer berries or chocolate stars to add contrast and flavor.
- Store leftovers in the fridge in a covered box, but enjoy them within a day or two.
 Save
Save Sharing a slice of this cake feels like giving a piece of the party itself. Here’s to milestones, memories, and a dessert that looks as bright as the occasion.
Recipe Questions
- → How do I achieve the ombre effect in cake layers?
Divide batter into separate bowls and add varying shades of blue gel coloring to create a gradient before baking.
- → Can I use natural food coloring instead of gel?
Gel coloring ensures vibrant hues, but natural colorants may produce softer tones—adjust amounts for desired effect.
- → What’s the best method for applying edible gold accents?
Use edible gold leaf or gold dust mixed with clear alcohol, applying gently with a brush for streaks or edges.
- → How can I keep the cake moist and tender?
Do not overmix the batter, and ensure each layer cools completely before stacking to prevent excess moisture loss.
- → Is this cake suitable for vegetarians?
Yes, it uses vegetarian-friendly ingredients—dairy, eggs, flour, and butter—with no meat or gelatin included.
- → Can I customize decorations for other occasions?
Absolutely! Swap gold accents for chocolate stars, fresh berries, or themed toppers to suit various celebrations.