 Save
Save I still remember the first time I saw a Fibonacci spiral in nature—it was on a sunflower head during a farmer's market visit, and I became obsessed with recreating that perfect mathematical beauty in bread. That afternoon, I decided to challenge myself: what if I could bake the Fibonacci sequence itself? Years of bread baking had taught me patience, but this project required something more—it demanded respect for both the science of fermentation and the poetry of natural proportions. The result was this stunning Fibonacci Spiral Growth Bread, where each segment builds upon the last, creating not just a loaf, but a conversation between mathematics and flavor.
I baked this for my sister's birthday brunch last spring, and watching her face when she saw the finished loaf arranged on our breakfast table—that moment justified every hour of planning and shaping. Her friends tore into it with the kind of reverence usually reserved for fine patisserie, and I realized then that beautiful bread isn't just about taste; it's about creating an edible memory that people actually remember months later.
Ingredients
- Strong bread flour (500 g): This is your foundation—it has enough protein to develop gluten strands that will hold the spiral structure together through all that shaping. I learned the hard way that all-purpose flour just can't handle the tension.
- Water, lukewarm (350 ml): Temperature matters more than you'd think; too cold and your fermentation stalls, too hot and you'll kill the yeast. Lukewarm means you can comfortably hold your finger in it without flinching.
- Sourdough starter or instant yeast (100 g starter or 7 g yeast): If you're using starter, make sure it's active and bubbly—this is what gives you those complex, slightly tangy flavors that make people ask for the recipe. Instant yeast works perfectly too if you're not a sourdough keeper.
- Fine sea salt (10 g): Don't skip this or reduce it thinking you're being healthy; salt strengthens gluten and brings out every other flavor. Fine salt dissolves evenly, which is crucial.
- Olive oil (15 ml): A good quality oil adds richness to the crumb and helps keep it tender. This isn't the place to use your fanciest oil, but don't use the cheapest either.
- Toasted sunflower seeds (20 g): Toasting them first brings out their nuttiness and prevents a raw, slightly bitter taste. This is your smallest spiral segment for a reason—it sets the pattern.
- Chopped walnuts (30 g): Toast these too for better flavor, and make sure they're chopped fairly small so they distribute evenly through the dough.
- Pumpkin seeds (40 g): These add a beautiful green-gold color and an earthy sweetness that grounds the recipe.
- Grated hard cheese like Gruyère or Parmesan (50 g): The umami from aged cheese transforms this from nice bread into something truly special. Grate it yourself from a block if possible—pre-grated contains anti-caking agents that affect texture.
- Sun-dried tomatoes, chopped and drained (60 g): Drain them really well or your dough will become too wet. Their concentrated sweetness and slight tang add complexity that surprises people in the best way.
- Mixed olives, pitted and chopped (70 g): Use good olives here—the briny, slightly funky ones make better bread than the mild canned kind. Pit them yourself if you can; it's meditative work.
- Sautéed spinach, well-drained (80 g): This is crucial: cook it first, then squeeze every drop of moisture out. Wet spinach will ruin your dough structure, and I learned this through an unfortunate, soggy loaf.
Tired of Takeout? 🥡
Get 10 meals you can make faster than delivery arrives. Seriously.
One email. No spam. Unsubscribe anytime.
Instructions
- Create the foundation with an autolyse:
- Combine your flour and lukewarm water in a large bowl, mixing just until everything is hydrated—you're not looking for smoothness yet, just an even, shaggy mass. Cover it with a damp towel and let it rest for 30 minutes. This seems like a small step, but those 30 minutes let the flour fully absorb water and start developing gluten naturally, which makes your final kneading so much easier.
- Build the dough:
- After the autolyse rest, add your sourdough starter (or yeast), salt, and olive oil. Mix everything together until you have a sticky, somewhat cohesive mass, then turn it onto a lightly floured surface. Knead for 8–10 minutes, using the heel of your hand to push the dough away from you, then folding it back over itself. You'll feel it transform under your hands—it should become smooth, elastic, and only slightly sticky. This is the moment you're building strength into the dough that will support all those toppings later.
- The long fermentation wait (this is where magic happens):
- Place your kneaded dough in an oiled bowl, cover it loosely, and let it sit at room temperature for 8–12 hours. If your kitchen is warm, it might be closer to 8 hours; if it's cool, go closer to 12. You're looking for the dough to roughly double in size and become visibly bubbly. This long, slow rise develops flavor that rushed bread will never have—the yeasts and bacteria are having a party in there, creating organic acids that taste deeply satisfying.
- Divide and portion:
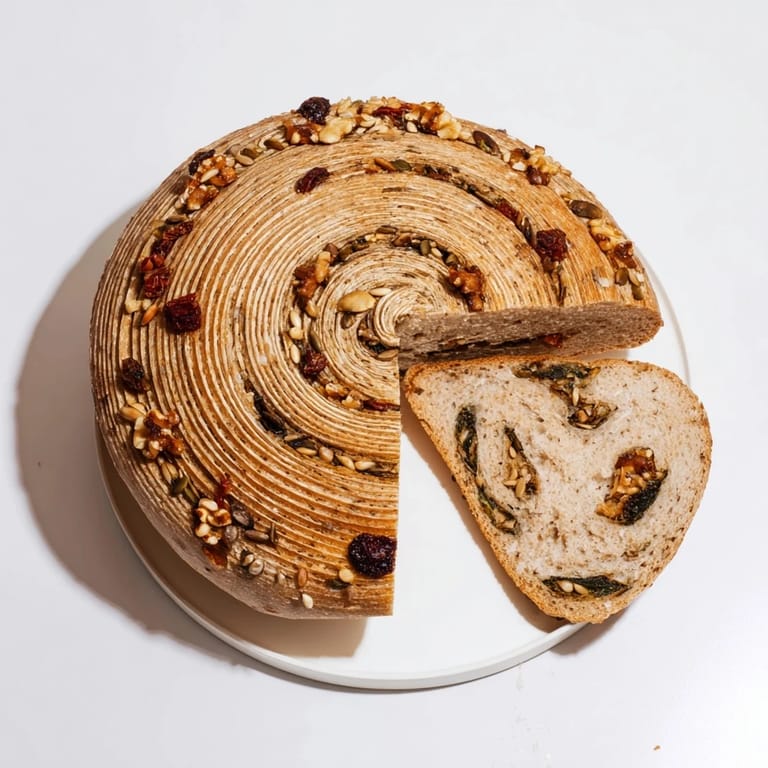
- Turn your fermented dough onto a lightly floured surface and divide it into 7 equal portions. Use a kitchen scale if you have one—this ensures each spiral segment will be proportional and beautiful. This is the moment where the Fibonacci sequence actually starts taking shape in your hands.
- Add toppings in increasing proportions:
- Here's where it gets fun and slightly involved: take your first portion and gently knead in the toasted sunflower seeds (20 g). Don't overwork it; you're folding and incorporating, not aggressively mixing. Then take the second portion and knead in the walnuts (30 g). Continue this process with each subsequent portion, increasing the amount slightly each time: pumpkin seeds, then cheese, then sun-dried tomatoes, then olives, ending with the spinach in the final, largest portion. The spinach is last and biggest because its moisture needs to be distributed through the most dough.
- Shape the spiral:
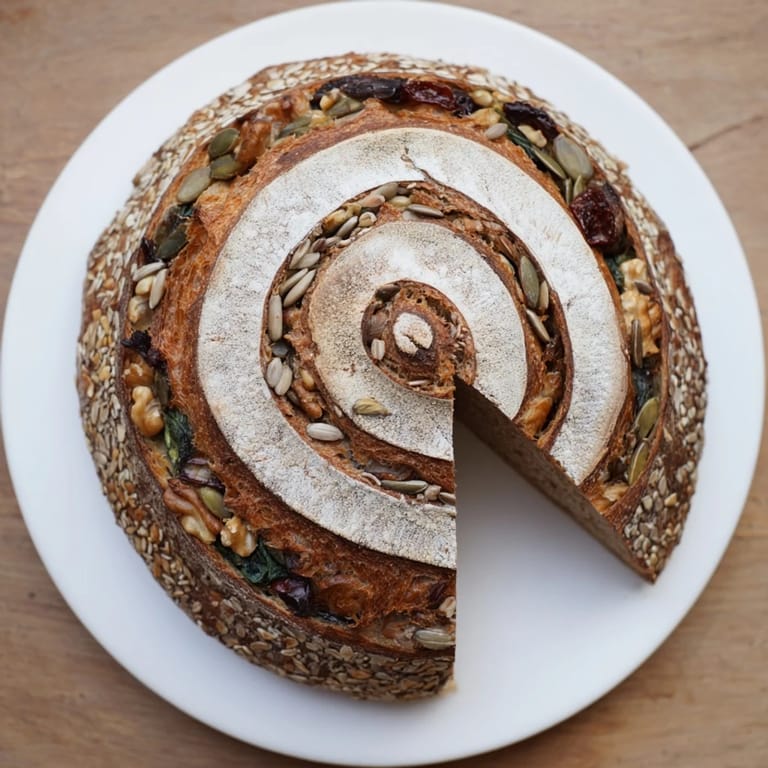
- Roll each portion into a rope—start with the smallest (sunflower) rope and coil it in the center of your parchment-lined baking sheet, starting from the middle and spiraling outward. Then take the walnut rope and coil it around the first, then the pumpkin, and so on, with each new addition making a slightly larger spiral ring. Press the end of each rope firmly into the last to create a seal that won't unravel during baking. This is the moment your bread becomes truly beautiful—step back and look at it. You've just shaped mathematics.
- Second rise:
- Cover your shaped spiral loosely with a towel or plastic wrap and let it rise for about 1.5 hours at room temperature. You're looking for it to puff up noticeably but not become so puffy that it looks like it might collapse. This is usually obvious—it'll look soft and alive.
- Prepare for steam and oven:
- About 30 minutes before baking, preheat your oven to 230°C (445°F). If your oven has a dedicated steam function, fantastic. If not, place an empty baking tray on the lowest oven rack—this will create steam when you pour hot water into it later. Dust your spiral loaf lightly with flour to help it brown evenly.
- Score with intention:
- Using a very sharp blade or bread lame, make shallow slashes along the spiral lines, following the pattern you created. These slashes let the bread expand dramatically in the oven, creating those beautiful ears and revealing the soft crumb underneath. Make confident cuts—hesitation creates ragged edges instead of clean ones.
- Create steam and bake:
- Just before sliding your bread into the oven, carefully pour a cup of hot water into the oven tray. You'll hear it sizzle—that's the steam that creates a crispy crust. Slide the baking sheet with your spiral bread in, close the door, and bake for 40 minutes, rotating the sheet halfway through so it colors evenly. The loaf is done when it's deep golden brown, sounds hollow when you tap the bottom, and smells absolutely incredible.
- Cool completely:
- This is the hardest part: remove your gorgeous loaf to a wire rack and let it cool completely before slicing. I know the aroma is maddening, but slicing warm bread releases steam and collapses the structure. Wait at least 45 minutes. It's worth every second of restraint.
 Save
Save The real magic happened when my neighbor, who thought she didn't like bread, asked for a slice. She ate it slowly, eyes closed, and then asked if I could teach her to make it. Now we bake together once a month, and that spiral loaf has become our tradition—proof that bread is never just food, it's an invitation to slow down and create something beautiful together.
Understanding the Fibonacci Spiral in Baking
The Fibonacci sequence—where each number is the sum of the two before it (1, 1, 2, 3, 5, 8, 13...)—appears everywhere in nature because it represents optimal growth and efficiency. When you apply it to bread, you're not just being clever; you're tapping into proportions that feel instinctively balanced to our eyes and our palates. Each segment in your spiral contains a slightly different flavor profile and density, which means the bread offers complexity and surprise with every slice. It's the difference between a loaf and an experience.
Timing and Temperature in Sourdough Fermentation
If you're using sourdough starter instead of commercial yeast, fermentation timing becomes more of an art than an exact science. A warm kitchen speeds things up dramatically—sometimes to just 6–8 hours—while a cool one might require the full 12 hours. The key is watching the dough, not the clock. You want visible bubbles, a dome-like shape, and a dough that jiggles slightly when you move the bowl. Temperature is everything: at 68°F (20°C), fermentation moves slowly but develops incredible flavor; at 75°F (24°C), it moves faster but might be less complex. Aim for somewhere in between if you can control your environment. A proofing box or even an off oven with the light on can help maintain consistent temperature.
Toasting Seeds and Nuts: The Flavor Difference That Matters
There's a reason restaurant bread tastes better than what we make at home, and it often comes down to a single step: toasting. Raw sunflower seeds taste almost grassy; toasted ones taste like sunshine and earth. Raw walnuts can be slightly bitter; toasted ones are rich and almost buttery. Spend 8–10 minutes toasting your seeds and nuts on a dry skillet over medium heat, stirring frequently, until they smell incredible and show the slightest color change. This single step transforms your bread from good to genuinely memorable.
- Toast all your seeds and nuts before adding them to the dough—it takes maybe 10 minutes total and changes everything about the flavor profile.
- If you forget and add them raw, don't panic; they'll still taste fine, just slightly less complex and nutty.
- Store toasted seeds and nuts in an airtight container for up to a week so you can make this bread multiple times without retoasting.
 Save
Save Every time I make this bread, I'm reminded that the most impressive things often come from patience, not complexity. You're simply letting time and fermentation do the work while you shape a story into dough.
Recipe Questions
- → What is the purpose of the Fibonacci spiral in this bread?
The spiral organizes dough portions with increasing amounts of additions, creating a layered texture and visual appeal.
- → How does the long rise time affect the bread?
Extended fermentation improves flavor complexity and develops a tender crumb with a natural leaven.
- → Can I modify the mix-ins in each spiral segment?
Yes, ingredients like seeds, nuts, and vegetables can be varied, increasing quantities in each segment for balanced texture.
- → Why is steam used during baking?
Steam creates a crisp crust by allowing the dough surface to expand before forming a firm outer layer.
- → Is this suitable for vegans?
Omit or substitute the cheese with vegan alternatives to suit a vegan diet without affecting the bread’s structure.