 Save
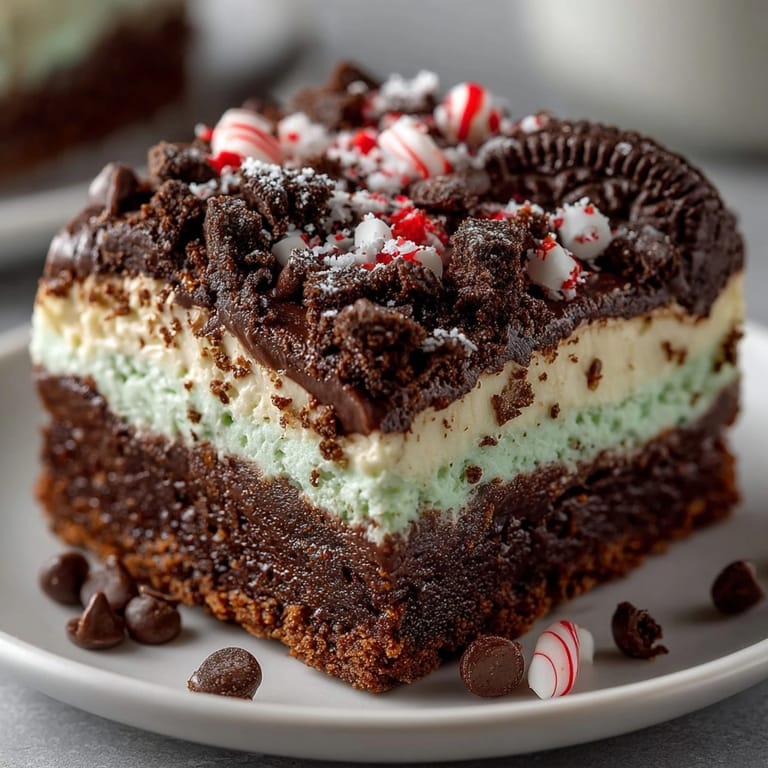
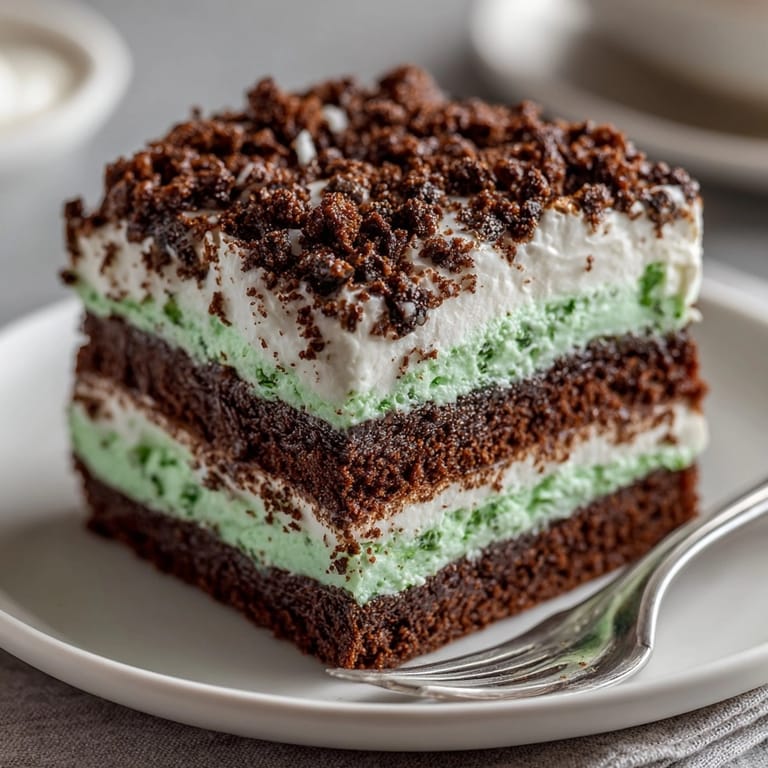
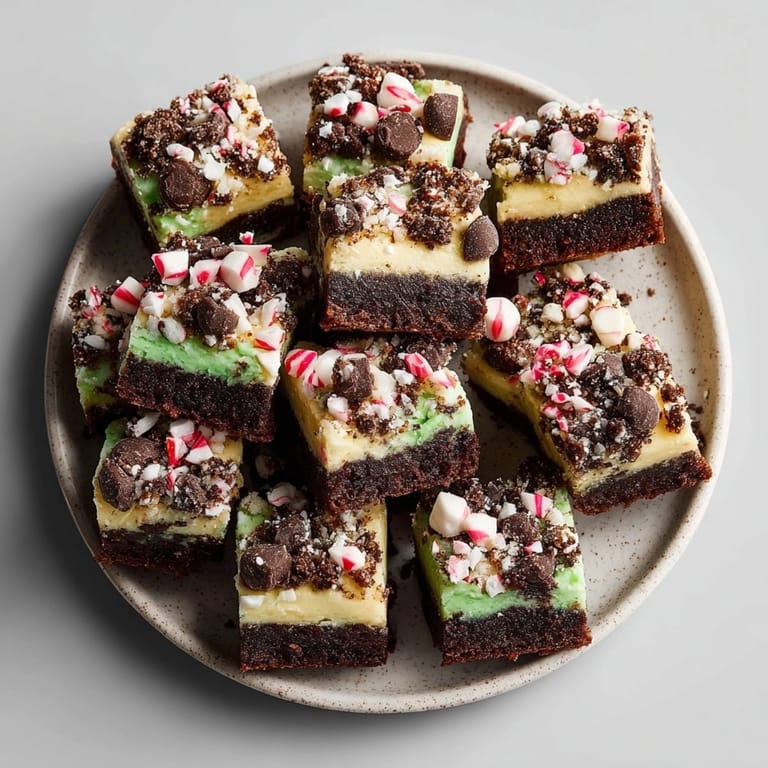
Save This decadent layered dessert combines the richness of chocolate with refreshing peppermint in a bar that's perfect for holiday gatherings or any time you need a special treat. The contrast between the fudgy cake base, creamy mint center, and crunchy cookie topping creates an irresistible texture combination that keeps everyone coming back for more.
I created these squares for a holiday potluck last year when I couldn't decide between making a cake or cookies. The combination was such a hit that several guests asked for the recipe before the night was over.
Ingredients
- Chocolate Cake Base: All purpose flour forms the foundation of our cake layer with just the right structure
- Unsweetened cocoa powder: provides rich chocolate flavor without excessive sweetness
- Baking powder: gives a slight rise while maintaining a dense fudgy texture
- Salt: enhances all the flavors and balances the sweetness
- Unsalted butter: adds richness and moisture to the cake
- Granulated sugar: sweetens the cake and helps create a tender crumb
- Large eggs: bind the ingredients and add structure
- Vanilla extract: complements and deepens the chocolate flavor
- Whole milk: adds moisture and creates a tender texture
- Peppermint Cream Layer: Cream cheese creates a tangy base that balances the sweetness
- Unsalted butter: adds richness and helps stabilize the filling
- Powdered sugar: sweetens while maintaining a smooth texture
- Peppermint extract: provides the signature flavor look for pure extract for best results
- Heavy cream: lightens the texture and makes the filling more spreadable
- Green food coloring: optional but adds visual appeal and helps guests identify the mint flavor
- Cookie Crumble Topping: Chocolate sandwich cookies provide crunch and additional chocolate flavor
- Mini chocolate chips: add pops of chocolate throughout the topping
- Crushed peppermint candy: brings extra mint flavor and a festive appearance
Tired of Takeout? 🥡
Get 10 meals you can make faster than delivery arrives. Seriously.
One email. No spam. Unsubscribe anytime.
Instructions
- Prepare the Pan:
- Line your 9inch square baking pan with parchment paper leaving overhang on all sides. This ensures easy removal after baking and clean slices when serving. Spray the exposed sides lightly with cooking spray to prevent any sticking.
- Mix Dry Ingredients:
- Whisk together flour cocoa powder baking powder and salt in a medium bowl until completely combined with no cocoa lumps remaining. This even distribution ensures consistent flavor throughout your cake base.
- Create Wet Mixture:
- Beat the melted butter and sugar in a large bowl until fully incorporated about 2 minutes. The mixture should be smooth and slightly thickened. Add eggs one at a time mixing well after each addition then stir in vanilla extract until the mixture is uniform and slightly aerated.
- Combine Wet and Dry Ingredients:
- Gradually add your dry ingredients to the wet mixture in three additions alternating with milk beginning and ending with dry ingredients. Mix just until combined after each addition no more than 10 seconds of mixing each time. This prevents overmixing which could make your cake tough.
- Bake the Cake Base:
- Spread the batter evenly in your prepared pan using an offset spatula to create a level surface. Bake in your preheated oven for exactly 22 to 25 minutes. The cake is done when a toothpick inserted in the center comes out with a few moist crumbs not wet batter. Allow to cool completely in the pan about 1 hour.
- Create Peppermint Filling:
- Beat cream cheese and butter together at medium speed until completely smooth and fluffy about 3 minutes. Gradually add powdered sugar 1/4 cup at a time beating well after each addition until light and fluffy. Mix in peppermint extract heavy cream and food coloring if using until perfectly smooth and an even color throughout.
- Assemble Middle Layer:
- Spread the peppermint cream evenly over the completely cooled cake base using an offset spatula. Make sure to spread all the way to the edges for even layers in every slice. The layer should be about 1/2 inch thick across the entire surface.
- Create Topping Layer:
- Combine crushed cookies mini chocolate chips and crushed peppermint candy in a medium bowl until evenly mixed. Sprinkle this mixture evenly over the peppermint layer then gently press down with the flat bottom of a measuring cup to help it adhere to the cream layer without pushing too hard.
- Chill and Set:
- Refrigerate the entire pan for at least 2 hours or overnight to allow all layers to set completely. This chilling time is crucial for clean slices and helps the flavors meld together beautifully.
- Slice and Serve:
- Use the parchment paper overhang to lift the entire dessert out of the pan. With a sharp knife cut into 16 even squares wiping the knife clean between cuts for the neatest presentation. Serve chilled for the best texture and flavor experience.
 Save
Save The crushed peppermint candy in the topping is truly what makes these squares special. I discovered this by accident when I had leftover candy canes after Christmas one year. The way they slightly soften into the cream cheese layer while maintaining some crunch creates this magical textural element that elevates the entire dessert.
Storage Tips
These squares keep beautifully in the refrigerator for up to 5 days when stored in an airtight container. I recommend placing parchment paper between layers if you need to stack them to prevent the topping from getting smashed. For the best texture always allow them to sit at room temperature for about 10 minutes before serving from the refrigerator.
Ingredient Substitutions
If peppermint isnt your favorite flavor this recipe works wonderfully with other extracts. Try almond extract with a sprinkle of sliced almonds on top or orange extract with a bit of orange zest in the cream cheese layer. For a dairy free version substitute plant based butter cream cheese and milk alternatives though the texture will be slightly different.
Seasonal Adaptations
Summer version swap peppermint for lemon extract and top with fresh berries. Fall variation use cinnamon in the cake and top with crushed gingersnaps. Winter holiday perfection use red and green sprinkles for festive appearance
Serving Suggestions
These squares are substantial enough to stand alone as a dessert but they truly shine when paired with the right accompaniments. Serve with a scoop of vanilla ice cream for an indulgent dessert plate or alongside a cup of hot coffee to balance the sweetness. For a festive presentation dust the serving plate with a little cocoa powder and add a small candy cane as garnish.
 Save
Save Success Stories
These squares have become my signature contribution to our neighborhood holiday exchange. Last year my neighbor who claims to dislike mint chocolate desserts ate three squares and asked for the recipe. The balance of flavors wins over even the skeptics. I now make a double batch because they disappear so quickly at gatherings.
Recipe Questions
- → How do I achieve a moist chocolate base?
Use fresh eggs and ensure not to overbake. Check with a toothpick; it should come out with a few moist crumbs.
- → Can I substitute the peppermint extract?
Yes, you can use vanilla or leave it out, but peppermint provides the signature cool flavor in the cream layer.
- → How do I crush the cookies and peppermint candy evenly?
Place them in a zip-top bag and use a rolling pin for even, bite-sized pieces.
- → Is chilling really necessary before slicing?
Yes, chilling firms up the layers, making clean slices and helping the flavors meld beautifully.
- → What other toppings can I use?
Swap peppermint candy with crushed candy canes or use additional mini chocolate chips for extra chocolatey crunch.
- → Can I make it ahead of time?
Absolutely! Prepare the day before, refrigerate, and slice when ready to serve; flavors only improve overnight.