 Save
Save My daughter came home from school clutching a handmade Easter card, and I knew exactly what had to happen in our kitchen that Saturday afternoon. She wanted deviled eggs, but not just any deviled eggs—she wanted them to look like baby chicks hatching from their shells. What started as a simple request turned into two hours of giggling, carrot shavings flying everywhere, and the kind of mess that only matters because it's happening with someone you love. These little chicks became her favorite Easter tradition, and now whenever spring rolls around, she's the one reminding me it's time to make them.
The first time I made these for a potluck, I arrived at the party convinced they'd fall apart in the car. Instead, people kept asking where I bought them, and I watched someone's grandmother lean over and whisper to her grandson that these were definitely made with magic. He believed her, and honestly, I didn't correct her—there's something magical about turning something as ordinary as a boiled egg into something that makes people smile the second they see it.
Ingredients
- 12 large eggs: Room temperature eggs peel more cleanly, so pull them from the fridge about 30 minutes before cooking if you have time.
- Mayonnaise (3 tablespoons): The backbone of the filling—use good quality mayo because you'll taste it, or swap for Greek yogurt if you want something tangier.
- Yellow mustard (1 teaspoon): Just enough to add a subtle punch without overwhelming the delicate yolk mixture.
- White vinegar (1 teaspoon): This brightens everything up and keeps the filling from tasting too rich.
- Salt and black pepper (¼ teaspoon salt, ⅛ teaspoon pepper): Season to taste because everyone's palate is different.
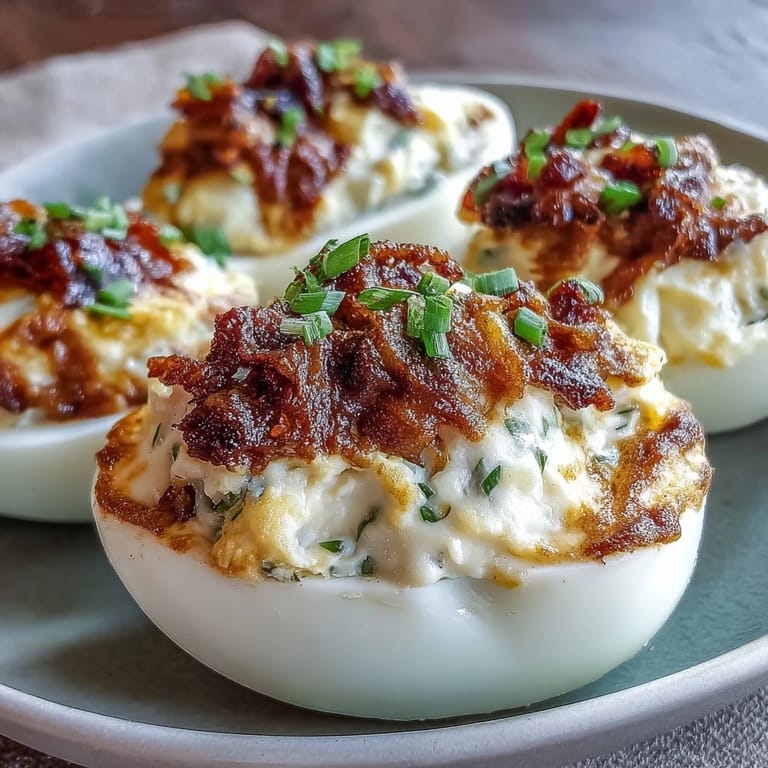
- Black peppercorns (24 whole): These become the chicks' eyes and honestly, they're the detail that makes people go "aww."
- Medium carrot (1): Cut into tiny triangles for beaks and thin slivers for feet—this is where the personality comes in.
- Fresh chives or parsley (optional): A tiny garnish that adds color and makes them look even more like they just hatched.
Tired of Takeout? 🥡
Get 10 meals you can make faster than delivery arrives. Seriously.
One email. No spam. Unsubscribe anytime.
Instructions
- Boil the eggs perfectly:
- Place eggs in a single layer in a large saucepan and cover with cold water. Bring to a boil over medium-high heat, then cover, remove from heat, and let stand for exactly 10 minutes—this is the secret to creamy yolks without that gray-green ring around them. Set a timer so you don't forget.
- Shock them in ice water:
- Transfer the eggs immediately to a bowl of ice water and let them cool completely, about 5 minutes. This stops the cooking and makes peeling dramatically easier.
- Peel with patience:
- Gently crack the shell all over and roll the egg to loosen it, then peel under cool running water if you can—the water helps separate the membrane from the white. Pat them dry on paper towels so they don't slide around.
- Create the foundation:
- For each egg, slice a small portion off the bottom so it stands upright without rolling around on your serving tray. Then carefully slice off the top third horizontally to create a little cap—imagine the chick is peeking out.
- Prepare the filling:
- Remove the yolks carefully and place the egg white bottoms on your serving tray. Mash the yolks with the mayonnaise, mustard, vinegar, salt, and pepper until it's completely smooth and creamy—no lumps allowed.
- Fill and mound:
- Using a spoon or piping bag, fill the bottom egg whites with the yolk mixture, mounding it slightly in the center to form the chick's head. This mounding is what gives them dimension.
- Add the caps at an angle:
- Place the egg white caps back on at a jaunty, slightly crooked angle—as if the chick is just breaking through. Straight caps look boring; wonky caps look alive.
- Carve the carrot details:
- Cut tiny triangles from the carrot for beaks and small slivers for feet. Gently press these into the yolk mixture where they'll stick naturally.
- Add the eyes:
- Place two black peppercorns on each chick for eyes, pressing them gently into the yolk mixture. This is the moment they come alive.
- Final touches:
- Garnish with fresh chives or parsley if desired for a pop of spring color. Serve chilled straight from the fridge.
 Save
Save There was a moment at my nephew's birthday party when he lined all twelve chicks up in a row and announced they were a family, then proceeded to name each one and create elaborate backstories about their adventures before hatching. His younger sister wanted to keep them on display instead of eating them. That's when I realized this recipe isn't really about the eggs at all—it's about creating something that sparks joy the moment someone sees it.
The Hardest Part (Spoiler: It's Not Hard)
The only genuinely tricky part is keeping the carrot pieces from sliding around while you're decorating. Here's what I learned: make sure your yolk mixture is thick and creamy enough to hold the decorations in place, almost like edible glue. If it's too loose, everything slides. If it's too stiff, you can't work with it. The texture should feel like really thick mashed potatoes.
Make-Ahead Magic
These chicks are a make-ahead dream, which is basically why they became my go-to Easter dish. I boil and peel the eggs the night before, make the filling, and assemble them in the morning. They stay perfectly fresh covered in the fridge for up to 24 hours, and honestly, the flavors get even better as they sit. The one thing I don't recommend doing ahead is adding the carrot beaks and feet more than a few hours early—they can get a little soft if they sit in the filling too long.
Flavor Variations That Work
Once you master the basic chick, you can play with the filling without losing that classic deviled egg taste. A pinch of smoked paprika adds a subtle depth, or fresh dill and a tiny squeeze of lemon juice takes them in a completely different direction. I've even added finely chopped fresh tarragon when I'm feeling fancy, and it pairs beautifully with the egg yolk richness.
- Swap Greek yogurt for mayo if you want a tangier, lighter version that still holds together perfectly.
- Use thinly sliced black olives instead of peppercorns for eyes if you prefer a softer texture or just like olives better.
- Fresh herbs like chives, dill, or tarragon mixed into the filling add personality without overpowering the delicate flavor.
 Save
Save These deviled egg chicks have somehow become more than just a recipe in our house—they're a signal that spring has arrived and something worth celebrating is happening. Make them, watch people's faces light up, and trust that you've just created a tiny moment of joy.
Recipe Questions
- → How do I boil eggs perfectly for deviled eggs?
Place eggs in a saucepan, cover with cold water, bring to a boil, then let stand covered off heat for 10 minutes. Cool in ice water before peeling for best results.
- → What can I use instead of mayonnaise in the filling?
Greek yogurt is a great lighter alternative that maintains creaminess while adding a slight tanginess to the filling.
- → How do I create the chick decorations on the eggs?
Cut small triangles from carrots for beaks and tiny slivers for feet, then gently press into the filling. Use black peppercorns as eyes to complete the look.
- → Can I prepare the deviled egg chicks ahead of time?
Yes, assemble and refrigerate them covered for up to one day to keep them fresh and flavorful.
- → Are there any flavor variations recommended?
Adding a pinch of paprika or chopped fresh herbs like chives or parsley to the filling can enhance the flavor and add freshness.