 Save
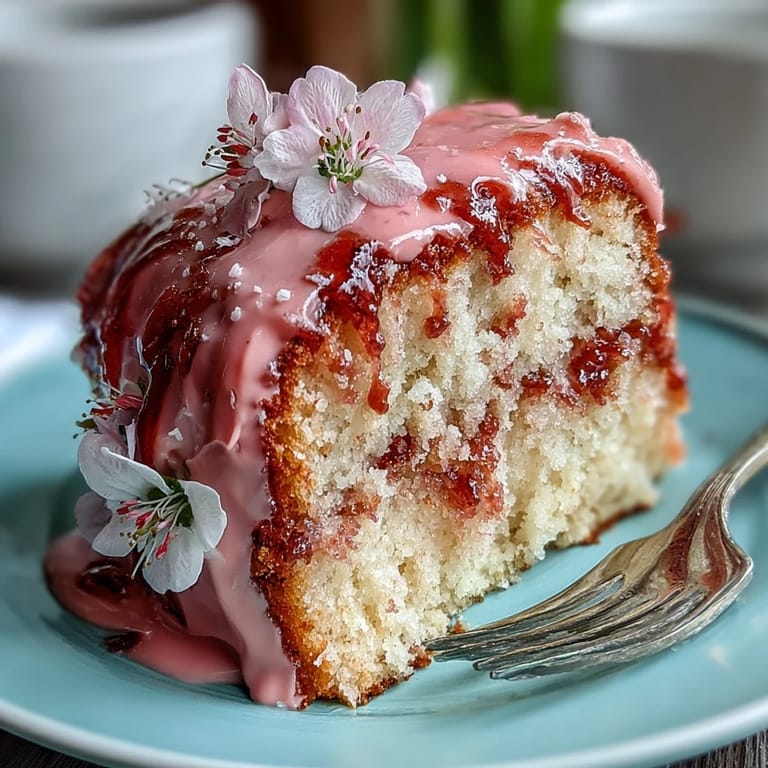
Save My sister called me three weeks before Mother's Day in a panic—she wanted to make something stunning for our mom but had never attempted a layer cake before. I talked her through making this pink ombre masterpiece over video chat, and watching her eyes light up when she saw the buttercream gradient come together was genuinely better than any gift I could've wrapped. Turns out, there's something about baking something beautiful that makes you feel like you're doing something meaningful, especially when it's for someone you love.
I still remember my neighbor leaning against my kitchen counter, watching me frost this cake for the first time, and she said something like, 'If I showed my mom a cake that beautiful, she'd actually believe I made it.' That moment made me realize this recipe isn't just about impressing people—it's about giving yourself permission to make something that feels fancy and achievable at the same time.
Ingredients
- All-purpose flour (2 ½ cups): The foundation of a tender crumb—make sure it's fresh and not compacted, as flour can settle in the bag and throw off your ratios.
- Baking powder (2 ½ tsp): This is your lift, so don't skip or reduce it; it ensures the cake rises evenly across all three layers.
- Salt (½ tsp): A pinch that sounds small but it makes the vanilla sing and balances the sweetness beautifully.
- Unsalted butter for sponge (1 cup): Room temperature is non-negotiable here—cold butter won't cream properly and you'll end up with a denser crumb.
- Granulated sugar (2 cups): The creaming process with butter aerates the batter, so take your time with this step and don't rush it.
- Large eggs (4): Room temperature eggs incorporate more smoothly and create a lighter, fluffier cake structure.
- Pure vanilla extract (1 tbsp for cake, 2 tsp for frosting): Real vanilla matters here—the imitation kind can taste a bit sharp, especially in a delicate vanilla cake.
- Whole milk (1 cup): Bring it to room temperature before using, or it will shock the warm batter and affect the texture.
- Unsalted butter for buttercream (1 ½ cups): This needs to be soft enough to leave a dent when you press it, but not so warm it's oily.
- Powdered sugar (5 cups, sifted): Sifting prevents lumps and gives you that cloud-like buttercream texture that spreads like silk.
- Milk or heavy cream (2-3 tbsp): Heavy cream gives a richer flavor and slightly sturdier frosting, but milk works perfectly fine.
- Pink gel food coloring: Gel coloring is your secret weapon—it won't thin out your buttercream the way liquid coloring does, and the shades are more vibrant.
- Edible flowers: Source these from a specialty grocery store or online supplier, never from a florist unless you know for certain they're pesticide-free.
Tired of Takeout? 🥡
Get 10 meals you can make faster than delivery arrives. Seriously.
One email. No spam. Unsubscribe anytime.
Instructions
- Prep your pans and preheat:
- Set your oven to 350°F and grease those three round pans generously, then line the bottoms with parchment paper—this is the insurance policy that prevents sticking frustration. I learned this the hard way when a beautiful cake stuck to one pan and tore when I flipped it.
- Build your dry ingredients:
- Whisk flour, baking powder, and salt together in a medium bowl and set it aside; this distributes the leavening evenly so you don't end up with random pockets of density.
- Cream your butter and sugar:
- Beat the room-temperature butter and sugar together on high speed for 3-4 minutes until it looks pale and fluffy—you're aerating the butter, which creates the lift in the cake. Stop occasionally to scrape down the bowl so nothing gets left behind.
- Add eggs one at a time:
- Beat in each egg separately, mixing well after each addition before adding the next one; this prevents the batter from looking curdled or broken. The whole mixture should stay smooth and creamy throughout.
- Add vanilla extract:
- Mix it in right after the last egg when the mixture is still emulsified, so it distributes evenly throughout the batter.
- Alternate wet and dry ingredients:
- Add the flour mixture in three additions, alternating with milk and starting and ending with flour—this three-part method prevents overmixing, which would develop too much gluten and make the cake tough. Mix just until you see no streaks of flour, then stop.
- Divide and bake:
- Split the batter evenly between your three pans and bake for 25-30 minutes until a toothpick inserted in the center comes out clean or with just a few crumbs. The tops should be pale golden and spring back when you press them gently.
- Cool with patience:
- Let the cakes cool in their pans for 10 minutes so they set just enough to release cleanly, then turn them out onto wire racks to cool completely. Don't skip this cooling step or you'll trap steam and end up with a gummy texture.
- Make the buttercream base:
- Beat the soft butter on high speed for 2-3 minutes until it's light and creamy, then gradually add your sifted powdered sugar on low speed so it doesn't explode all over your kitchen. Once combined, add vanilla and milk, then beat on high for 3 minutes until it's fluffy and spreadable.
- Create the ombre effect:
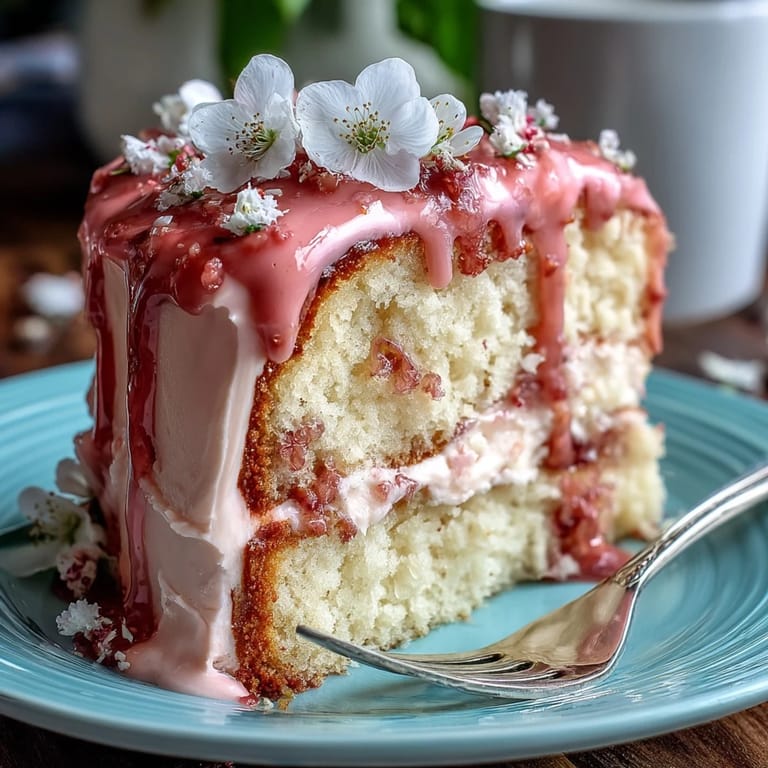
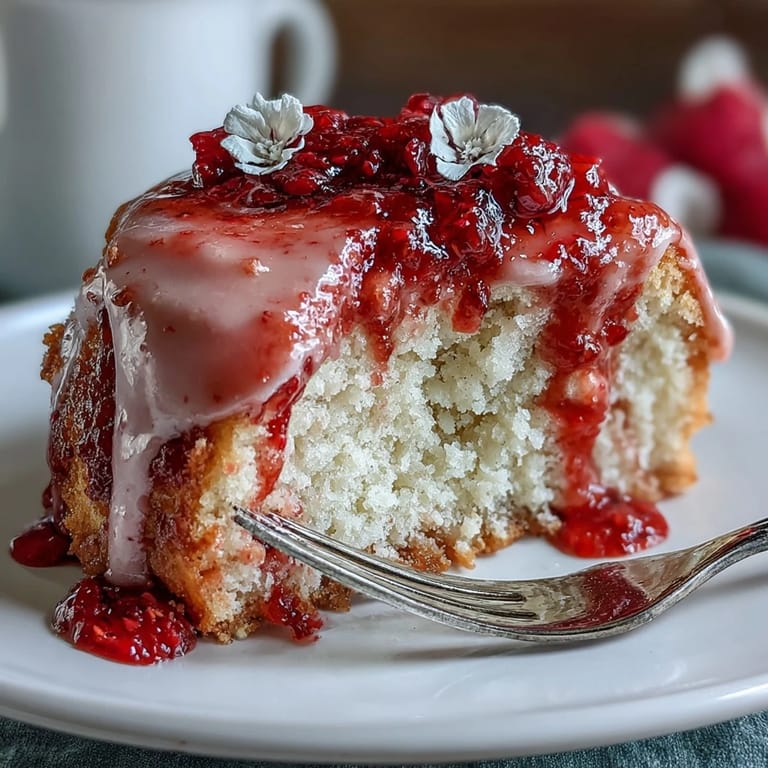
- Divide the buttercream into four bowls and leave one white, then add increasing amounts of pink gel coloring to the other three—start with just a toothpick dab and build up the color gradually. You want white, pale pink, medium pink, and deep pink shades that look intentional.
- Layer and frost:
- Place your first cooled cake layer on a serving plate, spread the darkest pink buttercream on top, add the second layer with medium pink, then the third layer. Cover the whole cake with white buttercream, using an offset spatula to get it smooth and even.
- Blend the ombre (optional but worth it):
- Use a bench scraper or offset spatula to gently blend the pink shades up the sides of the cake, creating a gradient effect that looks incredibly professional. This step takes patience but transforms the cake from pretty to show-stopping.
- Decorate and chill:
- Arrange your edible flowers on top, then pop the whole cake in the fridge for at least 30 minutes before slicing—the cold buttercream holds a clean edge so much better. This is also when you'd remove any non-edible decorative flowers right before serving.
 Save
Save What really got me about making this cake was realizing that fancy-looking desserts don't have to be complicated—they just have to be made with a little care and attention. My mom took one bite and got a bit teary, and my sister felt like a completely different baker after that day.
Making It Your Own
This cake is incredibly versatile, so don't feel locked into exactly following my color choices or decorations. I've made versions with peachy tones for spring, deeper roses for a more dramatic look, and even one with an ombre that goes from white to blush to burgundy. The structure is solid enough that you can experiment with different food coloring combinations, and the edible flowers can be whatever's in season or available—I've used forget-me-nots, pansies, and even candied rose petals when I'm feeling fancy.
Storage and Make-Ahead Tips
You can actually bake these cake layers 1-2 days ahead and store them wrapped in plastic wrap at room temperature, which takes some of the day-of stress out of the equation. The buttercream can also be made a day ahead and stored in an airtight container in the fridge—just let it come to room temperature and re-beat it for a minute or two before frosting. The assembled cake keeps beautifully in the fridge for up to 3 days, though the fresh flowers are best added within a few hours of serving so they don't wilt.
Why This Cake Became My Go-To
I've made this cake for Mother's Day, bridal showers, birthdays, and honestly just because I wanted something beautiful to exist in my kitchen for a moment. There's something about a cake that looks this polished but doesn't require a culinary degree to pull off—it sits in that sweet spot between impressive and achievable.
- You can make it ahead in stages, which means less kitchen chaos on the day you're serving it.
- The vanilla sponge is forgiving enough that minor mistakes don't completely derail the whole project.
- Fresh flowers take it from homemade-cake territory to something that could've come from a professional bakery, which honestly feels like a small magic trick.
 Save
Save Making this cake isn't just about having something delicious to eat—it's about taking a moment to create something beautiful for someone who matters. That's what keeps bringing me back to this recipe, every single time.
Recipe Questions
- → How is the pink ombre effect achieved?
The buttercream is divided into multiple portions and tinted with varying amounts of pink gel food coloring, creating a gradient from dark to light shades.
- → What type of flowers are suitable for decoration?
Edible flowers such as violets, pansies, and rose petals add delicate beauty and are safe to consume. Non-edible toppers should be removed before serving.
- → Can the sponge be prepared in advance?
Yes, the vanilla sponge layers can be baked ahead of time, cooled, and wrapped tightly before assembly to save time on the day of serving.
- → What is the best way to achieve a smooth buttercream finish?
Use an offset spatula and optionally a bench scraper to smooth the buttercream evenly on the cake, blending the ombre effect along the sides.
- → How can I ensure clean slices when serving?
Chilling the decorated cake for at least 30 minutes before cutting helps the buttercream set, resulting in cleaner, neater slices.
- → Are there any allergens to be aware of?
This cake contains wheat, eggs, and dairy. Edible flowers may also cause allergic reactions in sensitive individuals.