Save
Save My kitchen smelled like a sports bar the first time I nailed these wings, and I couldn't stop grinning. It wasn't some grand cooking moment—just me realizing that the secret to restaurant-quality crispy wings was hiding in my pantry all along: buttermilk, cornstarch, and the patience to let them rest between coating and frying. My friends still text asking for the recipe, and honestly, I think it's because they taste like they came from somewhere special, not because I'm a genius in the kitchen.
There was this Tuesday when I decided to test the double-fry method while my roommate was studying for an exam, and the smell of hot oil somehow made him forget all about stress and join me in the kitchen instead. We ended up tossing batches in different sauces, comparing which one was best, laughing about which sauce had too much heat or not enough tang. That's when I knew these weren't just appetizers—they were an excuse to gather people around something delicious and simple.
Ingredients
- Chicken wings (1.2 kg or 2.5 lbs), separated at the joint with tips removed: Using whole wings split into flats and drumettes gives you more surface area for that golden crust and makes them way easier to eat.
- Buttermilk (1 cup): This is the magic—the acidity tenderizes the meat while the dairy creates a clingy base for the coating; if you don't have it, mix regular milk with lemon juice and wait five minutes.
- Salt (1 teaspoon): Don't skip seasoning the marinade itself; it flavors the meat from the inside out.
- Black pepper (1/2 teaspoon): Fresh cracked pepper makes a noticeable difference in the final taste.
- Garlic powder (1 teaspoon): Ground garlic stays put in the coating, unlike fresh garlic which can burn.
- Onion powder (1 teaspoon): Adds savory depth without the moisture that fresh onion would bring.
- Paprika (1/2 teaspoon): Gives a subtle smoky note and a hint of color to the coating.
- Cayenne pepper (1/2 teaspoon, optional): Only add this if you want heat in every bite; the sauces provide plenty of punch on their own.
- All-purpose flour (1 1/2 cups): The foundation of your crispy coating.
- Cornstarch (1/2 cup): This is the secret ingredient that makes the coating crunch—don't use a floury substitute.
- Baking powder (1 teaspoon): The acid in baking powder helps create tiny air pockets that turn into bubbles during frying, making everything crispier.
- Sunflower or peanut oil for deep frying: Use neutral oils with high smoke points; avoid olive oil unless you enjoy bitter, burnt flavors.
- Hot sauce like Frank's RedHot (1/3 cup for Buffalo): This brand stays emulsified with butter better than thicker sauces.
- Unsalted butter, melted (2 tablespoons for Buffalo): Freshness matters here since you're not cooking it further.
- Honey (1 teaspoon for Buffalo): A tiny bit of sweetness balances the heat without making it dessert-like.
- Thai sweet chili sauce (1/2 cup): Check the label to make sure you're getting the runny kind, not the thick paste.
- Lime juice (1 tablespoon for Thai): Brightens everything and cuts through richness.
- Fish sauce (1 teaspoon for Thai, optional): Adds umami complexity, but it's genuinely optional if the smell bothers you.
- BBQ sauce (1/2 cup): Pick your favorite brand because this sauce carries itself.
- Fresh chives or scallions, celery sticks, blue cheese or ranch dressing (for garnish and serving): These sides aren't just decoration—cool crisp celery and creamy dressing are the perfect contrast to hot salty wings.
Tired of Takeout? 🥡
Get 10 meals you can make faster than delivery arrives. Seriously.
One email. No spam. Unsubscribe anytime.
Instructions
- Marinate the wings in buttermilk and spices:
- Toss your wing pieces with buttermilk, salt, pepper, garlic powder, onion powder, paprika, and cayenne in a large bowl, making sure every piece gets coated. Cover the bowl and stick it in the fridge for at least thirty minutes—overnight is even better because the flavors have time to sink into the meat and the acidity works its tenderizing magic.
- Mix your dry coating blend:
- In a separate bowl, whisk together flour, cornstarch, and baking powder, breaking up any lumps so the coating is even and light. This step takes two minutes and makes the actual dredging process so much smoother.
- Coat each wing and let them rest:
- Working with one wing at a time, lift it from the buttermilk, let the excess drip back into the bowl, then dredge it thoroughly in the flour mixture, pressing gently so the coating adheres and doesn't just fall off in the oil. Once all wings are coated, arrange them on a wire rack and let them sit for about ten minutes—this resting time lets the coating dry slightly and cling better during frying.
- Heat your oil to the right temperature:
- Pour oil into a large heavy pot or deep fryer until it reaches about two inches deep, then slowly bring it to 175°C (350°F), using a thermometer to check because eyeballing it often leads to soggy or burnt wings. Once it's ready, keep that temperature steady by frying in batches and giving the oil time to recover between batches.
- Fry wings in batches until golden and crispy:
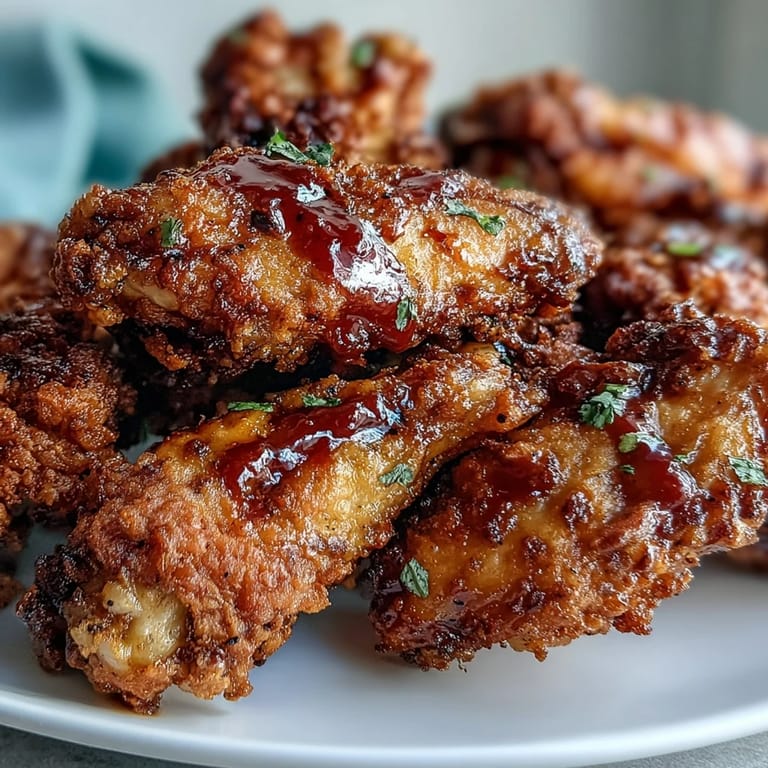
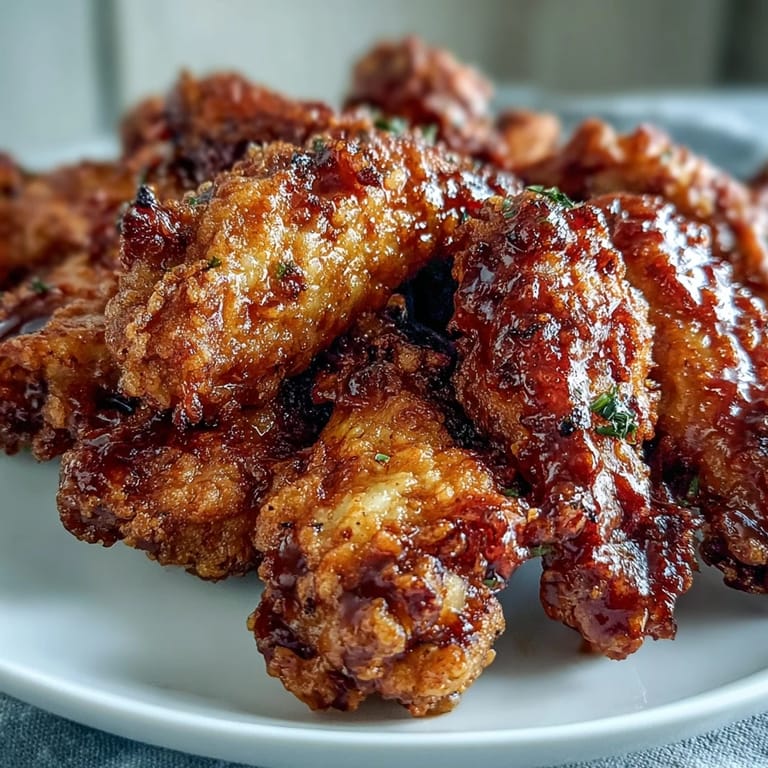
- Gently lower wings into the hot oil in small batches—crowding the pot drops the temperature and steams them instead of crisping them—and let them fry for eight to ten minutes, turning them occasionally with tongs so they brown evenly. You'll know they're done when they're deep golden and the coating sounds crispy when you tap it; drain them immediately on a wire rack set over paper towels so they stay crisp and don't get soggy.
- Prepare your three sauce options:
- For Buffalo sauce, whisk together hot sauce, melted butter, and honey until smooth. For Thai sweet chili, stir together sweet chili sauce, lime juice, and fish sauce if using.
- Toss wings with sauce and serve:
- Divide your crispy wings into three groups and toss each with a different sauce, or set the sauces out for dipping if your crowd can't agree. Scatter fresh chives and celery sticks around the platter, set out blue cheese or ranch dressing on the side, and watch them disappear.
 Save
Save One night I made these wings while my sister was going through a rough breakup, and she sat at my kitchen counter picking at wings and telling me her whole story as I pulled batch after batch from the oil. By the end of the night, her fingers were orange from sauce and she was laughing at something ridiculous I'd said, and somehow wings and conversation had done what pep talks couldn't.
Why the Coating Matters More Than You'd Think
The real reason these wings turned out so different from my early attempts was finally understanding that cornstarch isn't just a thickener—it absorbs moisture from the buttermilk marinade and creates a surface that fries up incredibly crispy, which regular flour alone can't do. The baking powder adds tiny air pockets that become bubbles during frying, making the coating light and crunchy rather than dense and heavy. I learned this the hard way after making soggy wings more times than I'd like to admit, then discovering these two ingredients changed everything about how the final wing felt in my mouth.
The Sauce Situation
Buffalo sauce is bold and vinegary and demands attention, Thai sweet chili is fruity and tangy with a creeping heat that sneaks up on you, and BBQ sauce is the crowd-pleaser that nobody argues about. I've learned that mixing sauces together sometimes creates something even better than serving them separately—Thai chili mixed with a tiny bit of Buffalo creates this interesting sweet-hot-spicy combination that surprises people. The magic is giving people options and letting them discover their own favorite, which usually starts a friendly debate that lasts through the entire plate.
Small Details That Actually Make a Difference
Letting the coated wings rest for ten minutes before frying isn't just something to do—it's the difference between a coating that stays put and one that sloughs off into your oil. Separating wings at the joints into flats and drumettes means more surface area for crisping and pieces that are way easier to eat than whole wings. Draining wings on a wire rack instead of paper towels alone keeps the bottom from getting soggy because air can circulate underneath.
- If you don't have a thermometer, grab one because guessing at oil temperature is how you end up with disappointing wings.
- Make sure your oil is fresh—old oil smells off and makes wings taste rancid no matter how perfect your technique is.
- Serve wings immediately after tossing with sauce because they start losing their crispiness the moment you dress them.
 Save
Save These wings have somehow become the thing I make when I want to show someone I care, or when I need to turn a regular night into something worth remembering. Once you've made them once and tasted how they should be, you'll never settle for frozen wings again.
Recipe Questions
- → How do I get extra crispy chicken wings?
For maximum crispiness, try double-frying: fry once at 150°C (300°F) for 7 minutes, let cool, then fry again at 190°C (375°F) for 2-3 minutes. The resting period after coating also helps create a crispier texture.
- → Can I make these wings ahead of time?
You can marinate the wings up to overnight for deeper flavor. Once fried, wings are best served immediately for optimal crispiness, though you can keep them warm in a 120°C (250°F) oven for up to 30 minutes.
- → What oil is best for frying chicken wings?
Sunflower or peanut oil work best due to their high smoke points and neutral flavors. Vegetable oil is also a good option. Avoid olive oil as it has a lower smoke point and can affect the taste.
- → How do I know when the wings are fully cooked?
Wings should be golden brown and crispy on the outside. The internal temperature should reach 75°C (165°F). They typically take 8-10 minutes per batch when frying at 175°C (350°F).
- → Can I make these wings gluten-free?
Yes, substitute the all-purpose flour with a gluten-free flour blend. The cornstarch and baking powder can remain the same. Ensure your sauces are also gluten-free by checking labels.
- → What's the best way to separate chicken wings?
Locate the joints between the drumette and flat sections. Use a sharp knife to cut through the cartilage at the joint. Remove and discard the wing tips, or save them for making stock.